



Exploring dense molecular structures like proteins can be challenging. When layers upon layers of atoms and residues block your view, it becomes difficult to focus on the internal details you need to analyze. This is where progressive clipping, a visual tool in SAMSON, comes in as an intuitive solution.
Unlike traditional clipping that creates abrupt cuts in your visualizations, progressive clipping offers a smooth, gradual transition. It also integrates fog effects for advanced depth perception, making it easier to spot structures as they fade in and out according to distance. Whether you’re conducting detailed research, teaching, or working on publication-quality visualizations, this feature can refine your approach to molecular modeling.
How Progressive Clipping Works
Progressive clipping adjusts the visibility of molecular structures based on their proximity to the camera. It creates smooth transitions between clipped areas and visible foregrounds, helping you visually interpret complex systems more easily. This feature is particularly useful when you’re navigating intricate proteins, enzymes, or molecular assemblies in 3D.
Here’s what makes progressive clipping a standout feature:
- Relaxed View of Dense Areas: Layered areas are gradually clipped for better focus on your region of interest.
- Enhanced Depth Perception: Integration with fog rendering allows for intuitive understanding of depth.
- Dynamic Adjustments: Control clipping and fog settings in real time using mouse and keyboard shortcuts or the interactive panel.
Getting Started with Progressive Clipping
To try progressive clipping in SAMSON, follow these steps:
1. Load a Structure
Open SAMSON and load any molecular structure—proteins, DNA, or even small molecules will work. Use Home > Fetch to quickly retrieve a protein of your choice.
2. Activate and Control Progressive Clipping
Good news! Progressive clipping is already activated by default. Here’s how you can control it:
- Keyboard and Mouse: Use the following shortcuts for adjustments:
- To change the clipping distance: Hold Ctrl (or Cmd on Mac) and scroll your mouse wheel or slide on a trackpad.
- To adjust the visible slab thickness (a combination of clipping and fog): Hold Shift + Ctrl (or Cmd) while scrolling.
- Viewport Toolbar: Click the clipping and fog control icon at the bottom of the viewport to access the Clipping Control Panel.
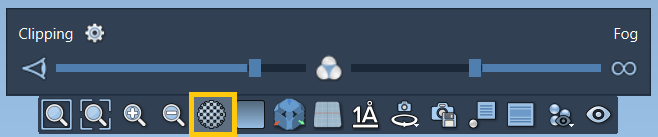
3. Customize the Appearance
Fine-tune your clipping settings by navigating to Interface > Preferences > Rendering > Clipping. Here’s what you can adjust:
- Clipping Style: Choose between progressive or traditional sharp-cut clipping.
- Edge Borders: Adjust the thickness of borders to make clipped regions stand out.
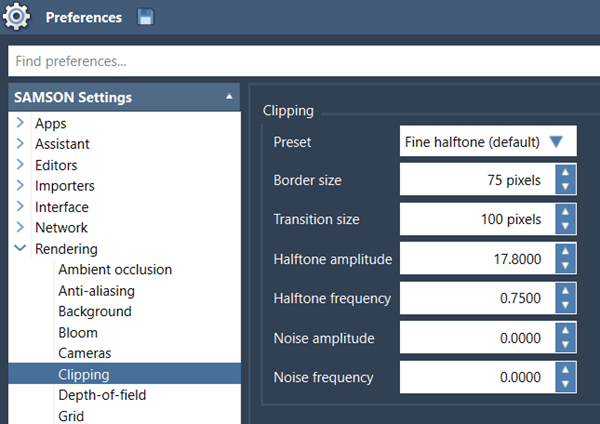
4. Combine with Other Visualization Features
Maximize the impact of progressive clipping by using it alongside complementary tools:
- Change the background color for clarity.
- Enable silhouettes for enhanced contour visualization.
- Utilize object selection to focus on specific residues or ligands.
Why Use Progressive Clipping?
This tool is incredibly versatile and can help you:
- Analyze binding sites or molecular pockets in detail.
- Enhance interactive teaching sessions with depth-focused presentations.
- Create clear, professional-quality visuals for research publications or conferences.
And if you ever lose sight of your molecular system, simply press Shift + Space to re-center the camera!
Learn More
Progressive clipping is just one of the many features SAMSON offers for molecular modeling. Explore the full documentation here to unlock even more capabilities.
SAMSON and all SAMSON Extensions are free for non-commercial use. Get SAMSON at www.samson-connect.net.