


Exploring large molecular systems, such as proteins or complexes, can often feel like peering into a dense forest—too much to see at once and no clear view of what’s inside. Whether you’re investigating binding sites or preparing images for presentations, seeing through your molecule without occlusion is essential.
If you’ve ever found yourself rotating endlessly or hiding parts of your model manually just to get the right angle, this post is for you.
What is Progressive Clipping?
In SAMSON 2025 R2, a new feature called progressive clipping was introduced. Unlike traditional clipping, which abruptly slices the view and removes anything behind the clipping plane, progressive clipping gently fades objects based on their distance from the camera. It’s integrated with fog rendering, so you get both depth perception and selective visibility—all in one.
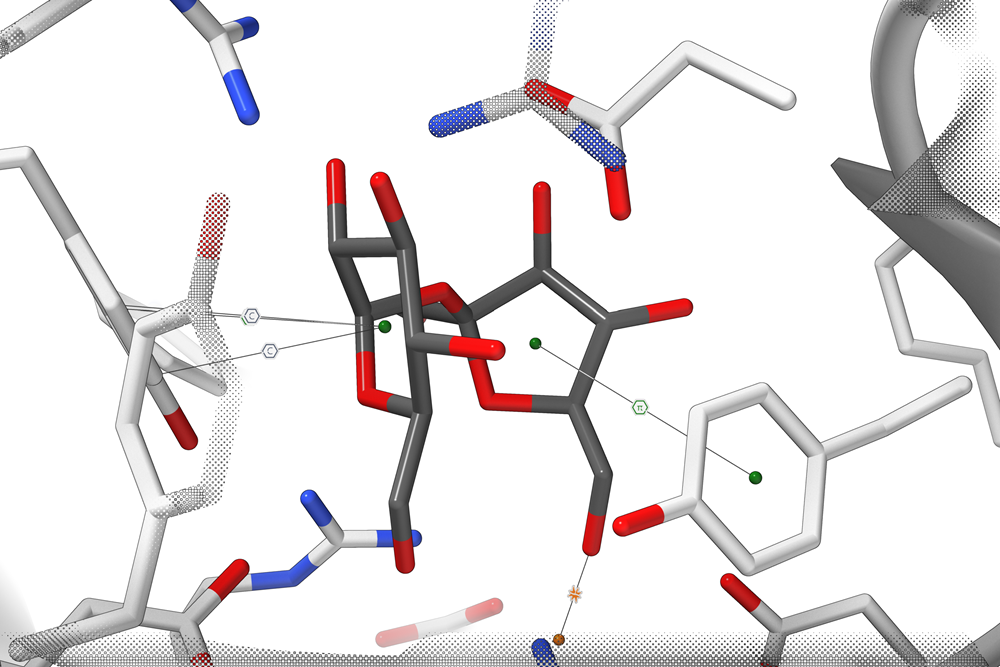
This is incredibly helpful for understanding the internal structures of complex molecules and is a great way to enhance your molecular visualizations.
How to Use It
1. Load a Molecular Structure
Start by loading a molecule using Home > Fetch inside SAMSON. Grab a protein or any dense molecular structure to make the most of the progressive clipping feature.
2. Activate and Control the Clipping
Progressive clipping is automatically enabled. Here’s how to interact with it:
- Clipping Distance: Press
Ctrl(orCmdon macOS) and scroll or gesture on your trackpad to move the clipping plane in and out. - Slab Thickness: Hold
Shift+Ctrl(orShift+Cmd) and scroll to adjust how deep the visible region is.
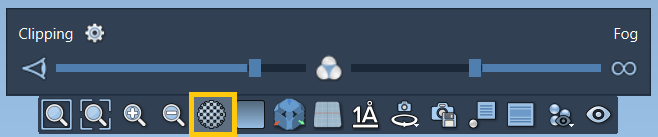
3. Use the Clipping Panel for Precision
At the bottom of the SAMSON viewport, you’ll find the clipping and fog control icon. Click on it to open the control panel:
- Adjust where clipping starts (left slider).
- Modify fog intensity and start distance (right slider).
- Toggle preferences and fine-tune appearance.
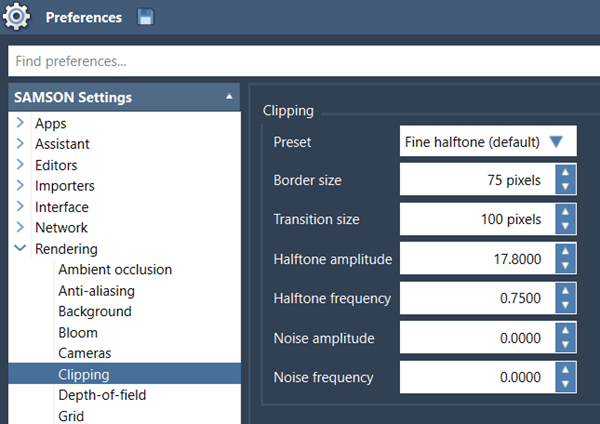
4. Customize Its Appearance
You can personalize the clipping effect by going to Interface > Preferences > Rendering > Clipping. Here, you can:
- Switch from progressive to traditional clipping styles.
- Modify the border size to make clipping boundaries more or less visible.
5. Combine With Other Visualization Tools
To get the most out of progressive clipping, use it alongside other SAMSON features, like:
- Silhouettes and background color changes for enhanced perception.
- Colorization and visual presets for thematic visuals.
- Selection + Labeling to highlight and annotate regions of interest, such as active or binding sites.
When is Progressive Clipping Most Useful?
- When exploring buried binding pockets or ligand environments.
- Creating depth-focused images for publications or slides.
- Teaching: to reveal internal regions of a structure live during a lecture.
With a few simple shortcuts, you can move from a cluttered 3D mess to a visually clean and informative scene.
To learn more, visit the full documentation here: https://documentation.samson-connect.net/users/latest/moving-around/
SAMSON and all SAMSON Extensions are free for non-commercial use. You can download SAMSON at https://www.samson-connect.net.