



One of the common challenges faced by molecular modelers is visualizing dense molecular structures. Proteins, for example, often create complex views when trying to focus on specific binding sites or interactions. Traditional clipping methods solve this to an extent, but they can feel abrupt and visually jarring. Welcome to progressive clipping, a thoughtful enhancement in SAMSON that makes molecular exploration more intuitive and visually seamless.
What is Progressive Clipping?
Progressive clipping smoothens the traditional abrupt cutoff in molecular visualizations. Instead of instantly hiding parts of a structure, progressive clipping provides a gradual fade for parts that are clipped based on their distance from the camera. This refined approach effectively integrates fog rendering, ensuring that molecular modelers can easily perceive depth and focus on intricate system details while gaining spatial context.
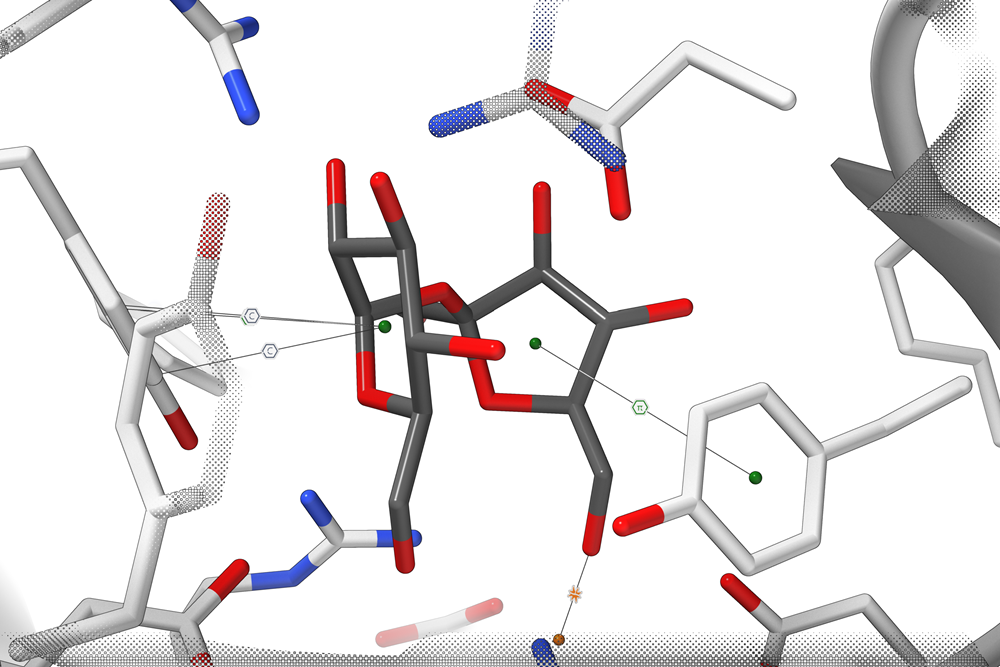
Why Should You Use Progressive Clipping?
If you often lose clarity while zooming into complex structures or need beautifully rendered visuals for presentations, progressive clipping may be the solution. It works exceptionally well when:
- Exploring internal ligand binding sites.
- Highlighting specific molecular interactions in dense systems.
- Preparing visually engaging images and animations for research publications or classroom demonstrations.
Getting Started with Progressive Clipping
1. Load a Structure: Start by loading any molecular structure, such as a protein. For example, select Home > Fetch in SAMSON to fetch a protein from a database.
2. Activate and Control: Good news—progressive clipping is activated by default in SAMSON. To adjust how clipping and fog impact your visualizations, make use of these controls:
- Mouse + Keyboard: Press Ctrl (or Cmd on macOS) and scroll to adjust the clipping distance. To modify the “viewing slab thickness” (the distance governed by clipping and fog), press Shift + Ctrl/Cmd while scrolling.
- Viewport Toolbar: Access the clipping and fog control icon at the bottom of the viewport to open SAMSON’s clipping control panel for more refined tweaks.
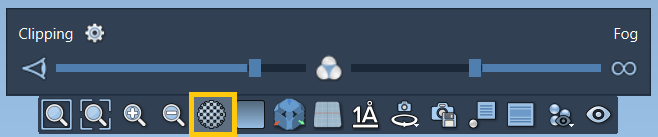
The control panel provides options to:
- Adjust the clipping distance (foreground).
- Set fog background visibility parameters.
3. Customize Appearance: Head over to Interface > Preferences > Rendering > Clipping where you can personalize the clipping style:
- Fine-tune border edge thickness.
- Switch between traditional (sharp cut) and progressive clipping modes.
Enhancing Your Molecular Scene
Combine progressive clipping with other visualization tools SAMSON provides. For example:
- Apply visual presets and add clarity with labeling tools.
- Enable silhouettes to focus on edges and depth.
- Use selective coloring to highlight key residues or domains for presentations.
These advanced options keep your molecules dynamically visible as you zoom and rotate, enhancing the overall clarity and sharpness of your models.
For a more hands-on understanding, check out SAMSON’s detailed documentation on progressive clipping to truly master this functional feature. Learn more here.
Note: SAMSON and all SAMSON Extensions are free for non-commercial use. Get started by downloading SAMSON from here.