


Exploring complex molecular structures, such as large proteins or densely packed nanomaterials, often presents a recurring challenge for modelers: internal features get visually buried inside layers of atoms. Rotating and zooming might help, but more often than not, you lose context or end up frustratingly toggling views to see what’s really going on inside.
That’s where progressive clipping in SAMSON comes in—a powerful and subtle visualization aid designed specifically to help you cut through molecular clutter while preserving visual context. Introduced in SAMSON 2025 R2, progressive clipping offers a smoother, more intuitive way to visualize internal molecular environments.
What is Progressive Clipping?
Unlike traditional clipping that harshly cuts off parts of your model at the clipping plane, progressive clipping gradually fades out structural elements as they move away from the camera. It blends seamlessly with fog rendering, helping you understand the spatial arrangement of atoms and residues based on their depth.
This is especially helpful when you’re:
- Inspecting binding sites embedded inside a protein.
- Creating visualizations that require depth perception for presentations or publications.
- Demonstrating molecular systems interactively in educational settings.
How to Use Progressive Clipping
- Load any structure via
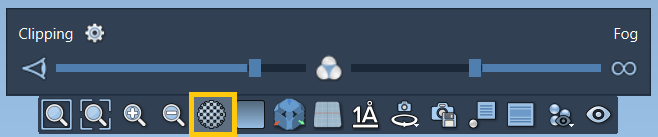
Home > Fetch. Choose a protein or complex current to your research. - Progressive clipping is on by default. But if you’re unsure, look for the Clipping icon at the bottom of the viewport to open the controller.
Interactive Controls
- Ctrl (or Cmd on macOS) + scroll: moves the entire viewing slab.
- Shift + Ctrl (or Cmd) + scroll: changes the thickness of the visible slab.
- Double-click the mouse wheel: quickly centers your view.
Control Panel Breakdown
The Clipping Control Panel shows the camera eye, target, and background zones. These reference zones are color-coded to provide feedback about where clipping and fog effects are currently applied. You can fine-tune these using simple drag gestures or by accessing more detailed preferences.
Customize for Clarity
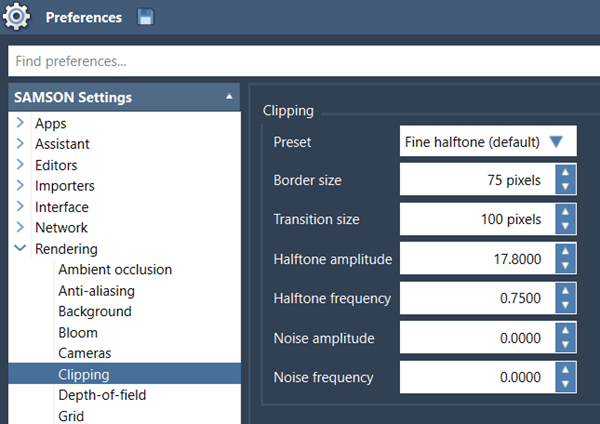
Go to Interface > Preferences > Rendering > Clipping to set visual presets and adjust clipping border thickness. Choose between progressive and sharp clipping depending on the communication goals of your visualization.
Combine and Enhance
Progressive clipping integrates well with other visualization tools in SAMSON:
- Change background colors for better contrast.
- Enable silhouette rendering to highlight structure boundaries.
- Label residues or atoms that remain visible through clipping.
- Select functional areas such as binding sites to focus viewer attention.
When to Use It
Think of progressive clipping as your dynamic camera operator. It’s not just for polishing pictures—it’s a tool for everyday modeling and molecular interrogation:
- Drug design: Identify how a ligand sits in the binding pocket without isolating it from its protein environment.
- Education: Show students clear transitions from surface to core.
- Collaboration: Create understandable visualizations for team discussions or publications.
To learn more about progressive clipping and other navigation techniques, visit the official SAMSON documentation.
SAMSON and all SAMSON Extensions are free for non-commercial use. You can get SAMSON at https://www.samson-connect.net.